How to Trim, Split,& Cut Videos?
Video trimming is an essential part of the video editing process. It requires a lot of patience and hard work, but with the right tools, it can be easy too. Trim a video using Movie Creator: Video Editor.

Movie Creator: Video Editor – Your Complete Video Editing Studio on Windows
With over 6 million downloads, Movie Creator: Video Editor stands as one of the most trusted and versatile video editing applications available on the Windows platform. Whether you are crafting video stories, editing travel clips, creating personalized greetings, or producing content for social media, this app offers a seamless experience with powerful tools and an intuitive interface.
Transform Everyday Moments into Cinematic Creations
Movie Creator: Video Editor empowers users to turn daily moments into polished video stories. No advanced skills are required—just creativity and vision. The app supports major video formats, including MOV and MP4, enabling compatibility with a wide range of devices and cameras.
Key Features:
Customizable Video Themes
Choose from a wide range of built-in video themes. Customize text by adjusting the font, size, and color to match the tone of your story.Dynamic Stickers and Text Timing
Add multiple stickers to your videos and define the exact moments when each sticker appears or disappears. The same level of timing control is available for text and background music as well.Advanced Trimming and Merging Tools
Precisely trim multiple parts of a video, and seamlessly merge them with other clips. Each trimmed segment can be customized further—apply unique effects or transitions to individual parts to enhance storytelling.Multiple Music Tracks and Audio Control
Add more than one background music track at custom positions on the video timeline. Replace original audio tracks or completely remove them to add your own soundtrack. Supported output audio formats include MP3, ALAC, AAC, WMA, AIFF, FLAC, and WAV. Additional formats can be requested via email.Video Effects and Filters
Apply visual filters like Sepia, Mirror, Negative, and others to enhance the visual mood of your clips. Effects can be applied to entire videos or selectively to trimmed sections.Professional Editing Tools
Split, copy, and rearrange trimmed clips with ease. Whether you are working with freshly recorded footage or previously trimmed segments, the app allows for further segmentation and fine-tuning.Step-by-Step User Guidance
A guided workflow walks users through the editing process, making it easy to organize, edit, and publish projects—even for beginners.Audio Replacement Made Simple
Remove existing background music and insert your chosen soundtrack for a fully customized audio-visual experience.
Best Practices and Tips:
For better organization, create a dedicated folder on your desktop to store all video files before editing. This will save time and ensure all assets are easily accessible.
Experiment with themes, effects, and audio tracks to bring out your unique storytelling style.
Movie Creator: Video Editor is the go-to application for anyone looking to create memorable videos, whether for personal memories, online content, or professional projects. It combines ease of use with a powerful feature set, helping you create high-quality videos with minimal effort.
Get started with your next video project and experience a smarter way to edit on Windows.
Step 1: Open the Application
To trim a video on your PC or laptop using Movie Creator: Video Editor, open the application on your device.
Step 2: Trim a Video
To trim a video in Movie Creator: Video Editor on your PC or laptop:
Click Select Video and choose the video file from your computer.
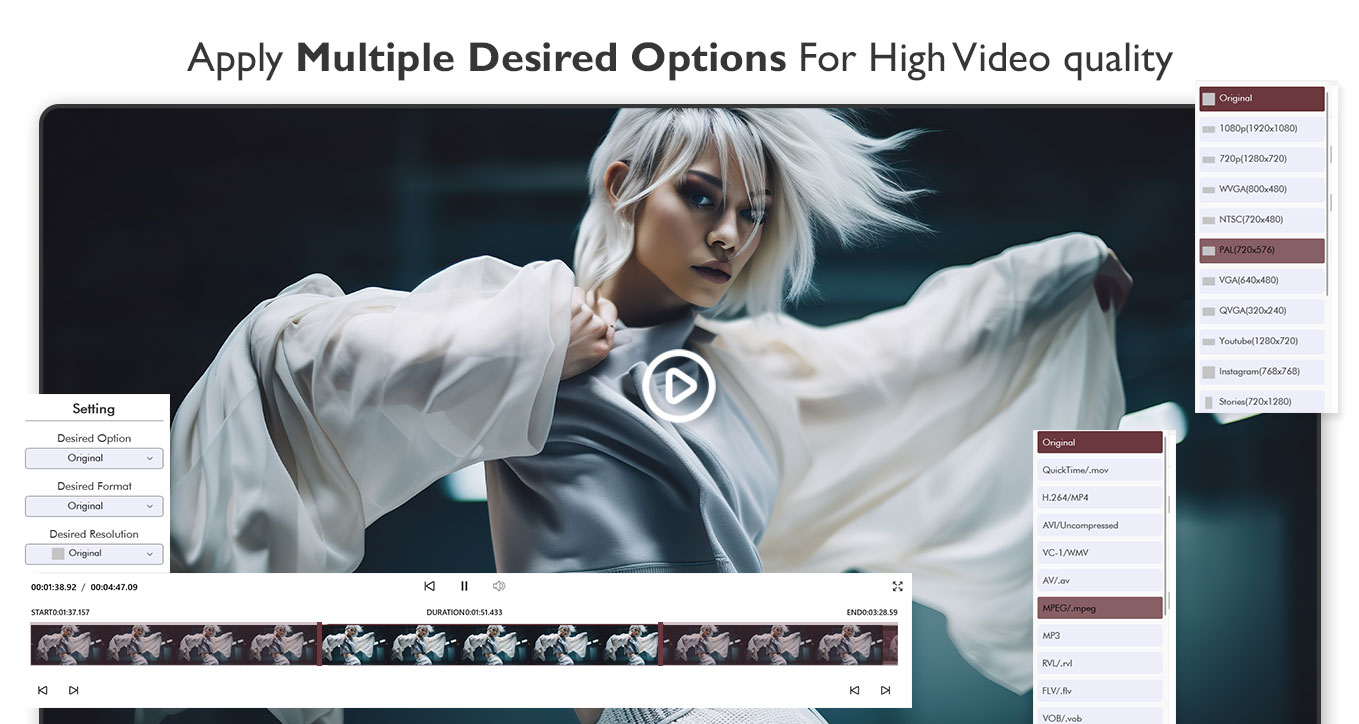
Use the End Time option at the bottom to set the desired video duration. You can also use the timer to skip or preview specific sections and view the video in full-screen mode.
To change the selected video, click the crossed arrows icon on the left.
Select your preferred video blur background, format, and resolution.
Click Continue, then choose Save or Save As to store the trimmed video in your desired location.